Five Common Mistakes to Avoid When Designing an Auditorium
By Jenna Brown
March 3, 2020

There’s a lot that goes into the design of an auditorium, from structural components to aesthetic choices, and it’s easy to overlook some details - especially when you're not working on these spaces day-in and day-out. Safety and patron experience should be the top priority in the design of an auditorium or theatre. We’ve compiled a list of frequently overlooked items we see in auditorium design. These items can have a big impact on the patron experience.
Keep in mind, everything shared here must be addressed before concrete is poured. Once concrete is poured, there is little that can be done to correct these issues without additional cost.
1. Use of Incline Breaks with a Constant Radius
Designing incline breaks, and therefore seating rows, along a radius is a great way to increase the maximum seating capacity of the auditorium while improving sight lines for patrons. However, issues occur when the incline breaks are set on a constant radius. When the same radius is used for each incline break and simply set back a few feet, it causes the rows to pinch together at the ends, which can lead to issues with clear passage and back to back spacing between rows of seating.
How to Avoid: Use Concentric Radii
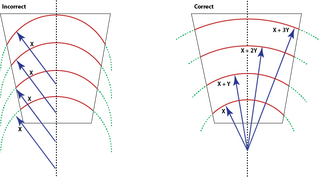
When planning the placement of incline breaks, use concentric radii. That is, use a larger radius for each incline break back from the focal point, as shown in the image below. You might picture the full circles like nesting dolls, where each doll fits inside the next one.
2. Forgoing Accommodations for Rear Walls & Obstructions

Accommodations often get overlooked for rear walls and other obstructions, like a front rail or low "pony" walls between rows. This error is due to the common misconception that all rows need to have the same front-to-back dimensions (depth). The result of this oversight is the obstruction interferes with the proper installation of the seating, which then has a ripple effect throughout the rest of the rows.
In the case of a rear wall, for example, when the tread of the last row is the same depth as the previous rows, the chairs have to be installed further forward on the tread to account for the back overhang. This shortens the length of clear passage between the back row and next row, which causes the seating on next row to be placed further forward on the tread, and so on down each row. This creates a gap between the rise face and chair back, as shown below. A patron’s foot can easily slip between this space, or personal belongings may fall into this space.
How to Avoid: Include Additional Depth on Rows with Obstructions

The easiest way to solve this problem is to design extra space on the tread of any row with an obstruction. This accounts for the back overhang of the chair and provides room for the correct clear passage on the row without creating hazardous gaps. In this example of a rear wall accommodation, making the back tread 44” instead of 36” is enough to account for these comfort and safety concerns, but the additional depth of this tread will vary depending on the dimensions of the chair.
3. Creating Hazardous Gaps in Intermediate Steps
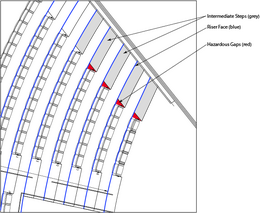
Another common design mistake that leads to hazardous gaps is in the planning of intermediate steps on treads and risers. When intermediate steps are planned on the radius of the row or parallel to the wall, they often leave a gap between the end of the step and the first chair of the row. This is because chair standards are installed perpendicular to the riser face, as shown here. Again, a foot, cane, walker, or personal belongings could fall into this gap, creating a hazard.
How to Avoid: Design Steps Perpendicular to the Riser Face
Knowing that chair standards are installed perpendicular to the riser face, design the inside edge of intermediate steps to be perpendicular to the riser face as well. This will ensure the edge of the step is tight to the chair and there is no significant gap.
4. Poor Sight Lines
Sight lines are determined by the focal point of the stage or screen, which is dependent upon the use of the space. For example, a space hosting dance performances will need to accommodate for a clear view of the stage floor to watch dancers’ feet. When sight lines are obstructed, patrons can miss out on some of the action, which contributes to a poor experience.
How to Avoid: Use Chair Stagger, Treads & Risers, & Max Chair Recline

Staggering chairs and using treads and risers to elevate seating are the primary ways to create good sight lines. When planning chair stagger spacing with treads and risers, make sure you have a clear placement of the focal point for the space.
Staggering chairs is especially important for spaces without an incline. Your seating supplier can help you determine chair stagger for the best view from any seat.
Additionally, new cinema seating trends toward comfy recliners. In a movie theater, no part of the screen should be obstructed from any angle—that includes the viewing angle from a seat in the maximum reclined position. If you’re planning to include reclining seats in your space, make sure to accommodate for the sight lines from reclined positions. Often, short "pony" walls are designed too high and end up blocking part of the screen when patrons are fully reclined.
5. Not Planning Row Spacing to Match Incline Breaks
Issues often arise when auditorium seating is intended to be installed on an incline as well as a radius. Use of a radius layout on an incline is a great way to create good sight lines. However, issues arise when the incline breaks are not poured on the same radius. For chair anchor integrity, a row of chairs can't straddle an incline break. In addition, patron comfort can be affected by this when a chair is installed on a separate incline than the row where the patron's foot will be resting - this often makes the seat height too high.
How to Avoid: Plan Concrete Incline Breaks with Desired Row Spacing

When planning and constructing a new space, make sure incline breaks match with the desired row spacing. To determine row spacing, obtain a chair profile from your chair provider. These dimensions will allow you to design the proper row spacing. Additionally, you’ll need the dimensions of any obstructions, such as a railing or low wall, to accurately plan incline breaks for the desired row spacing. Keep in mind, most chairs need to be installed 3" from an incline break for anchor integrity.
Closing Thoughts
Understanding the intended use of the space you’re designing is important to planning seating arrangements. Considerations for sight lines, row radii, riser and tread depth, and incline breaks will depend on the space’s purpose, and these considerations should be included in planning before concrete is poured to ensure a positive patron experience.